Pages

November 30, 2013

Vintage Christmas at Sugar Creek Hollow!


This week our theme at Sugar Creek Hollow is Vintage Christmas! I am always looking for fun images to print out and use for my cards, and just loved this one with its built in sentiment.

I added some yummy crochet lace and red vintage seam binding then added some gorgeous wooden snowflakes and pearls. I distress the edges and used Walnut Stain Distress Ink.

This week our guest designer is Avril Branthwaite, please go visit her and see her beautiful creation!!!

Hope you will join us this week for our challenge!!!

November 29, 2013

Warm Winter Wishes Candle and Gift Card for Creative Expressions


This week I used the gorgeous hellebore from the Winter Flower stamp plate to make a decorative candle and card for my Christmas gifting!

Candles are very simple to make, you use the same process I shared with my soap image transfer project. First simply stamp your image onto tissue paper using Sepia Archival Ink and color in (I used Fired Brick and Peeled Paint Distress Inks, which I used like paint using water and the ink pad). You simply cut around the image and tack it onto the candle in the place where you want it.


Finally just cover the tissue paper with a bit of greaseproof paper and use your heat tool to melt the wax into the tissue paper! The greaseproof paper doesn't stick, so it is the perfect thing to help keep the tissue paper smoothed down against the candle, just peel it back to check that the tissue paper has "melted" into the candle...when it is done there is a coat of wax over the tissue paper and it looks like you have stamped straight onto the candle.  Really amazing results and not very complicated at all!! I plan on doing several of these for gifts this year!!


To add a subtle sheen to my hellebores I added a new favorite product of mine: Enchanted Gold Gilding Wax. Finally, I added a gorgeous Brown/Ivory Grosgrain Stripe Ribbon and twine to the candle for a gorgeous finishing touch.


To finish off my gift set I cut an A4 sheet of Foundations Card in Dark Roast Coffee in half and scored it in half again to make a nice small gift card. I used a journal card from the Heartfelt Creations Antiquities paper pad and stamped the rose again in Sepia Archival Ink onto some other light patterned Antiquities paper. Again I colored the stamped image in Fired Brick and Peeled Paint Distress Inks and fussy cut it. I layered the stamped image onto the journal card and added a Square Dazzler. Finally I added the With Love sentiment.

Thanks so much for stopping by!!!


Umount Winter Flowers A5 Stamp Plate  Archival Ink Pad SepiaFoundation Card Dark Roast Coffee A4 220gsm pk 25
Distress Pad Peeled PaintDistress Pad Fired BrickRibbon GrosGrain Stripe Brown/Ivory 1.5

Heartfelt Antiquity Paper CollectionCreative Expressions Gilding Wax Enchanted Gold Dazzlers pk10 Assorted Squares 


November 28, 2013

Vintage Cutie Cards


Hi!! Cathi here again with a November Nesting Components Kit themed project, a set of two vintage cards, one of my favorite things to do with the gorgeous vintage images and papers we get in the kits!!


The November kit has tons of Prima Delight goodies! A 6x6 pad, buttons, some wood pieces...and gorgeous Prima doilies and flowers. I just had to use them and the adorable Vintage Cuties Clip Art Sheet images to make my project this week!! The stamp set included this month is the Leaf Border Clear Stamp Set, I used both stamps included for my cards, the solid one makes a fun pattern around my vintage girl in pink in the first card, and I repeated the open leaf border as a pattern for my second card. For my first card I layered a big Prima flower and doily and added in two gorgeous Prima Delight buttons. I tied twine around the card like the little girl has a bow around her hair. I used Picked Raspberry Distress Ink for my stamping and my edge inking on this card.


My second card has the open leaf border stamping in Walnut Stain Distress Ink, again using a gorgeous piece of Prima Delight paper. I added a doily, another vintage cutie image a wooden frame and a button for this one. Simple but sweet.

Everything bar the twine came from the November Nesting Components Kit and I still have so much left from this kit, plus a gorgeous doily mask that I didn't get a chance to use here, look for it on a future layout project!!!

Don't forget to check out the stunning art piece that Norma made with the kit!


Dana made a beautiful layout with the kit:


This amazing kit sold out in record time, but be on the lookout soon for the December kit! Could it be that it is beginning to look a lot like Christmas???? I don't know? Can't wait to find out what beautiful things the December Nesting Component Kit will contain!


Friends Layout for Visible Image


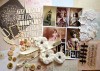
This week I wanted to focus on the gorgeous The Sewing Room stamp set from Visible Image. I fell in love with all the elements from this set and used many of them on the layout: the perfect sentiment "Friends", the measuring tape, the dress form, the two buttons and the stitch line.  I think the stitch line will be a learning curve for me when you are trying to fit it into a shape smaller than the stamp length!! I just consider my stitch lines "rustic" on my patchwork squares background!!


I stamped and embossed the dress form with a great textured embossing powder: Ranger Antiquities California Stucco. I fussy cut it out and then used the Bronte Border stamp to add a subtle script pattern. I added a bit lace and a Prima Finnabair metal piece to finish it. You can see above where I added the two stamped buttons and measuring tape.


I also added the Ripped Fishnet stamp as texture in Chipped Sapphire Distress Ink and the Grunge Polka Dot with some gesso to add more interest to the background. Here you can see a layered chipboard piece that I used from the BoBunny Avenues collection. I added a few Prima flowers from my stash to finish the layout. 

I really love how this turned out and I hope you enjoyed looking! If you like any of the stamps, simply click on the link or image to head to the shop.


Visible Image also run a challenge each month on their blog.
This month the theme is:
Use a Visible Image Sentiment stamp on a project and link it up, easy peasy,
and you could win £20 of your choice of Visible Image gorgeousness!
Join us over at our fan page on Facebook or join our GROUP!
This month if you load a Visible Image project you've created in the group,
you also have a chance at the £20 prize, you have to be in it to win it though,
so I hope you have a look at the site and get some stamps and join in.

HUGE NEWS FOR FRIDAY!!!!


As you may already know, this coming Friday is known as 'Black Friday.'
So, from midnight this Thursday to Midnight on Friday, Visible Image will have a HUGE 50% OFF.....
YES 50% OFF selected stamps and stamp sets!!! 
WOW! Not to be missed! 

Whether you want to buy some NEW stamps for yourself, 
get Christmas pressies for crafty friends, 
or add stamps to your own Christmas wish list....
the date you need is THIS FRIDAY - NOVEMBER 29TH!!! THE PLACE - VISIBLE IMAGE WEBSITE!
www.visibleimage.co.uk
Don't miss out!


November 26, 2013

Poinsettia Lullaby Gilded Card


Hey! I'm here today with another gilded quick and simple card using a product that I have only recently discovered, but that can make your cards look rich and luxurious: Gilding Flakes! These multi colored flakes of gilding metals give an amazing sheen to anything they are used on. You can use glue and stamps to make stamped images colored in the metals or you can do what I did and use an adhesive sheet to make an entire metallic background.


Here I am holding onto a 5" x 5" square adhesive sheet, piling the gorgeous gilding flakes onto the surface. 


Use your fingers to smooth in the flakes onto the entire sheet and then you can use a stamp scrubber foam to get rid of any excess and buff it to a gorgeous sheen.


Next I took the gorgeous Wrapped In Joy: Poinsettia Lullaby embossing folder and embossed the gorgeous pattern into my gilding flake sheet.


I added a simple sentiment using the center die from the Fleur-de-Frame Nesting Die. I used the die as a stencil as well and inked through it with Walnut Ink Distress Stain and my Sponge Dauber.


I've added some subtle gesso highlights to help the embossed patterns stand out, stamped a sentiment on my label added a golden bow.


Another quick and simple card with an amazing luxurious look!!

Hope you enjoyed this tutorial and that you will share any work you do with these gorgeous dies and folders on our Facebook page!!


Couture Creations products used:


Holiday Jubilee Cards for Frosted Designs


I got the gorgeous Prima Holiday Jubilee papers, flair and wooden pieces from the Frosted Designs store this month (some gelatos and a mask and a few other things jumped in my cart too!!) and this week I wanted to make some cards for my day on the blog!  These can also be inspiration for the 11 Challenge this week, there is LOTS of paper layering going on here and some tags as well!


My first card uses some ripped cardboard from I recycled from a goodies parcel. I added some gesso to be like snow onto it. I fussy cut a tag and the gorgeous children on a sleigh image and also got the Seasons Greeting sentiment from the paper as well! I added a Holiday Jubilee flair and some cheesecloth to finish it off.


For my second card I layered lots of gorgeous paper, added a flower and flair and a wooden X-mas sticker. I finished it off with a bit of twine.


My final card has more tags and journal pieces from the paper and another sentiment, Holiday Cheer. I added a bit of gesso and cheesecloth, some twine and some more gorgeous flairs!

I'd love to enter these in the Prima 12 Days of Christmas!!!